Wednesday 20 March 2013
Anil Yadav: memcache
Anil Yadav: memcache: Memcached with PHP. Memcahced open source distributed memory object caching system it helps you to speeding up the dynamic web appli...
Tuesday 19 March 2013
memcache
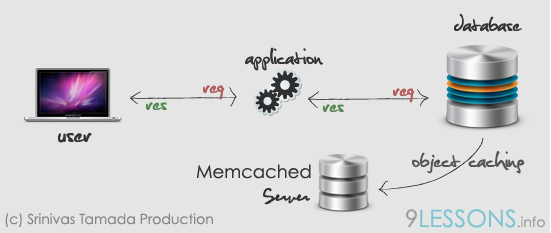
Memcached with PHP.
Memcahced open source distributed memory object
caching system it helps you to speeding up the dynamic web applications
by reducing database server load. In this post I want to explain how I
had implemented Memcached object caching system for This system is very helpful for high traffic media and blog related websites.
Database
Sample database demos table contains id, title and link.
CREATE TABLE demos
(
id INT PRIMARY KEY AUTO_INCREMENT,
title VARCHAR(300),
link VARCHAR(300),
);
(
id INT PRIMARY KEY AUTO_INCREMENT,
title VARCHAR(300),
link VARCHAR(300),
);
First User Request
First request goes to database server at the same time data object storing in Memcached server.
Second User Request
Second user request data comes from Memcached object.

Memcached Installation
Lots of better resources available on web please follow the links. php_memcache.dll
INSTALLING MEMCACHED ON AMAZON LINUX AMI - QUICK AND EASY.
INSTALLING MEMCACHED ON Windows.
install Memcached on Xampp on Windows 7
Memcached for PHP 5.3 on Windows 7.
index.php
Contains PHP code.
<?php
include('db.php');
$memcache = new Memcache;
$memcache->connect('localhost', 11211) or die ("Could not connect");
$key = md5('List 9lessons Demos'); // Unique Words
$cache_result = array();
$cache_result = $memcache->get($key); // Memcached object
if($cache_result)
{
// Second User Request
$demos_result=$cache_result;
}
else
{
// First User Request
$v=mysql_query("select * from demos order by id desc");
while($row=mysql_fetch_array($v))
$demos_result[]=$row; // Results storing in array
$memcache->set($key, $demos_result, MEMCACHE_COMPRESSED, 1200);
// 1200 Seconds
}
// Result
foreach($demos_result as $row)
{
echo '<a href='.$row['link'].'>'.$row['title'].'</a>';
}
?>
db.php
You have to change hostname, username, password and database name.
<?php
$mysql_hostname = "localhost";
$mysql_user = "username";
$mysql_password = "password";
$mysql_database = "database";
$bd = mysql_connect($mysql_hostname, $mysql_user, $mysql_password)
or die("Opps some thing went wrong");
mysql_select_db($mysql_database, $bd) or die("Opps some thing went wrong");
?>
pay pal intigration
Payment System with Paypal
I received a tutorial requests from my reader that
asked to me how to implement payment gateway system with Paypal API. In
this post I want to explain how to work with Paypal Sandbox test
accounts for payment system development and sending arguments while
click buy now button. It’s simple and very easy to integrate in your web
projects.

 Download Script
  Live Demo
Sample database design for Payment system. Contains there table users, products and sales.

Users
CREATE TABLE `users` (
`uid` int(11) AUTO_INCREMENT PRIMARY KEY,
`username` varchar(255) UNIQUE KEY,
`password` varchar(255),
`email` varchar(255) UNIQUE KEY,
)
`uid` int(11) AUTO_INCREMENT PRIMARY KEY,
`username` varchar(255) UNIQUE KEY,
`password` varchar(255),
`email` varchar(255) UNIQUE KEY,
)
Products
CREATE TABLE `products`
(
`pid` int(11) AUTO_INCREMENT PRIMARY KEY,
`product` varchar(255),
'product_img` varchar(100),
`price` int(11),
`currency` varchar(10),
)
(
`pid` int(11) AUTO_INCREMENT PRIMARY KEY,
`product` varchar(255),
'product_img` varchar(100),
`price` int(11),
`currency` varchar(10),
)
Sales
CREATE TABLE `sales`
(
`sid` int(11) AUTO_INCREMENT PRIMARY KEY,
`pid` int(11),
`uid` int(11),
`saledate` date,
`transactionid` varchar(125),
FOREIGN KEY(uid) REFERENCES users(uid),
FOREIGN KEY(pid) REFERENCES products(pid)
)
(
`sid` int(11) AUTO_INCREMENT PRIMARY KEY,
`pid` int(11),
`uid` int(11),
`saledate` date,
`transactionid` varchar(125),
FOREIGN KEY(uid) REFERENCES users(uid),
FOREIGN KEY(pid) REFERENCES products(pid)
)
Step 1
Create a Paypal Sandbox account at https://developer.paypal.com/
Step 2
Now create test accounts for payment system. Take a look at Sandbox menu left-side top Sandbox->Test Accounts
Step 3
Here I have created two accounts Buyer (personal) and Seller (merchant/business) 
products.php
Contains PHP code. Displaying records from products table product image, product name and product price. Here you have to give your business(seller) $paypal_id id. Modify paypal button form return and cancel_return URLs.
<?php
session_start();
require 'db_config.php';
$uid=$_SESSION['uid'];
$username=$_SESSION['username'];
$paypal_url='https://www.sandbox.paypal.com/cgi-bin/webscr'; // Test Paypal API URL
$paypal_id='your_seller_id'; // Business email ID
?>
<body>
<h2>Welcome, <?php echo $username;?></h2>
<?php
$result = mysql_query("SELECT * from products");
while($row = mysql_fetch_array($result))
{
?>
<img src="images/<?php echo $row['product_img'];?>" />
Name: <?php echo $row['product'];?>
Price: <?php echo $row['price'];?>$
// Paypal Button
<form action='<?php echo $paypal_url; ?>' method='post' name='form<?php echo $row['pid']; ?>'>
<input type='hidden' name='business' value='<?php echo $paypal_id; ?>'>
<input type='hidden' name='cmd' value='_xclick'>
<input type='hidden' name='item_name' value='<?php echo $row['product'];?>'>
<input type='hidden' name='item_number' value='<?php echo $row['pid'];?>'>
<input type='hidden' name='amount' value='<?php echo $row['price'];?>'>
<input type='hidden' name='no_shipping' value='1'>
<input type='hidden' name='currency_code' value='USD'>
<input type='hidden' name='cancel_return' value='http://yoursite.com/cancel.php'>
<input type='hidden' name='return' value='http://yoursite.com/success.php'>
<input type="image" src="https://paypal.com/en_US/i/btn/btn_buynowCC_LG.gif" name="submit">
</form>
<?php
}
?>
</body>
success.php
Paypal payment success return file. Getting Paypal argument like item_number. Paypal data success.php?tx=270233304D340491B&st=Completed&amt=22.00&cc=USD&cm=&item_number=1
<?php
session_start();
require 'db_config.php';
$uid = $_SESSION['uid'];
$username=$_SESSION['username'];
$item_no = $_GET['item_number'];
$item_transaction = $_GET['tx']; // Paypal transaction ID
$item_price = $_GET['amt']; // Paypal received amount
$item_currency = $_GET['cc']; // Paypal received currency type
//Getting product details
$sql=mysql_query("select product,price,currency from producst where pid='$item_no'");
$row=mysql_fetch_array($sql);
$price=$row['price'];
$currency=$row['currency'];
//Rechecking the product price and currency details
if($item_price==$price && item_currency==$currency)
{
$result = mysql_query("INSERT INTO sales(pid, uid, saledate,transactionid) VALUES('$item_no', '$uid', NOW(),'$item_transaction')");
if($result)
{
echo "<h1>Welcome, $username</h1>";
echo "<h1>Payment Successful</h1>";
}
}
else
{
echo "Payment Failed";
}
?>
Positive approach
cancel.php
Paypal API cancel_return file.
<?php
session_start();
$username=$_SESSION['username'];
echo "<h1>Welcome, $username</h1>";
echo "<h1>Payment Canceled</h1>";
?>
session_start();
$username=$_SESSION['username'];
echo "<h1>Welcome, $username</h1>";
echo "<h1>Payment Canceled</h1>";
?>
Negative approach
Step 4
When your web application test payment
system workflow is completed. Change the form action development API
URLs to original API URLs and give valid $paypal_id seller email id.$paypal_url='https://www.sandbox.paypal.com/cgi-bin/webscr';
to
$paypal_url='https://www.paypal.com/cgi-bin/webscr';
Saturday 9 March 2013
php udp socket client
<?php
/*
Simple php udp socket client
*/
//Reduce errors
error_reporting(~E_WARNING);
$server = '127.0.0.1';
$port = 9999;
if(!($sock = socket_create(AF_INET, SOCK_DGRAM, 0)))
{
$errorcode = socket_last_error();
$errormsg = socket_strerror($errorcode);
die("Couldn't create socket: [$errorcode] $errormsg \n");
}
echo "Socket created \n";
//Communication loop
$i=1;
while(1)
{
$i++;
//Take some input to send
echo 'Enter a message to send : ';
$input = $i;
sleep(5);
//Send the message to the server
if( ! socket_sendto($sock, $input , strlen($input) , 0 , $server , $port))
{
$errorcode = socket_last_error();
$errormsg = socket_strerror($errorcode);
die("Could not send data: [$errorcode] $errormsg \n");
}
//Now receive reply from server and print it
/* if(socket_recv ( $sock , $reply , 2045 , MSG_WAITALL ) === FALSE)
{
$errorcode = socket_last_error();
$errormsg = socket_strerror($errorcode);
die("Could not receive data: [$errorcode] $errormsg \n");
}
echo "Reply : $reply";
*/}
?>
socket create through php socket
<?php
error_reporting(~E_WARNING);
//Create a UDP socket
if(!($sock = socket_create(AF_INET, SOCK_DGRAM, 0)))
{
$errorcode = socket_last_error();
$errormsg = socket_strerror($errorcode);
die("Couldn't create socket: [$errorcode] $errormsg \n");
}
echo "Socket created \n";
// Bind the source address
if( !socket_bind($sock, "127.0.0.1" , 9999) )
{
$errorcode = socket_last_error();
$errormsg = socket_strerror($errorcode);
die("Could not bind socket : [$errorcode] $errormsg \n");
}
echo "Socket bind OK \n";
//Do some communication, this loop can handle multiple clients
while(1)
{
echo "Waiting for data ... \n";
//Receive some data
$r = socket_recvfrom($sock, $buf, 512, 0, $remote_ip, $remote_port);
echo "$remote_ip : $remote_port -- " . $buf;
//Send back the data to the client
socket_sendto($sock, "OK " . $buf , 100 , 0 ,$remote_ip ,$remote_port);
}
socket_close($sock);
?>
install node.js
install dependencies to retrieve, build and browse.
$ sudo apt-get install g++ curl libssl-dev apache2-utils
$ sudo apt-get install git-core
Retrieve from repository.
$ git clone git://github.com/ry/node.git
Build node.js.
$ cd node
$ ./configure
$ make
$ sudo make install
Create ‘helloworld.js’.
var http = require('http');
http.createServer(function (req, res) {
res.writeHead(200, {'Content-Type': 'text/plain'});
res.end('Hello World\n');
}).listen(1337, "127.0.0.1");
console.log('Server running at http://127.0.0.1:1337/');
Run ‘helloworld.js’.
$ node helloworld.js
Server running at http://127.0.0.1:1337/
Browse to verify
http://127.0.0.1:1337/
Subscribe to:
Posts (Atom)